Cluster Installation – setting WCM_HOST and WCM_PORT

When you set up a WebSphere Portal cluster, the WCM_HOST and WCM_PORT environment variables need to be changed so they point to your webserver address. This is important for syndication. If you don’t make this change, syndication will go through the individual node instead of the load balancing webserver. This is a problem if the individual node goes down – syndication will also stop too!

We don’t really give you a ‘scriptable’ way to do this, which would be good if you needed to do it many many times. The manual steps are described in the infocenter topic for Portal 7.0 here (step 10).

This is easily remedied with a quick ConfigEngine script:


Simply copy this to a new xml file under PortalServer/wcm/prereq.wcm/config/includes, and then on each node in your cluster, run

./ConfigEngine.sh point-wcm-at-webserver -DWebServerHost=www.yourwebserver.com

Alternatively, if you don’t want to copy the script to each node, you can set the ServerName and NodeName variables on the command line too and just invoke the task as many times as you have cluster nodes.

Posted in howto | Leave a comment

Getting the IBM Bootable Media Creator (BoMC) to run on Ubuntu 10.04

IBM Bootable Media Creator (BoMC) is a nifty tool that will create a customized boot iso for installing drivers and firmware on your System x machines. You tell BoMC what hardware you are running and it goes out and downloads all the latest firmware, and then it wraps it up in an iso that you can boot from to update the hardware.

If you’d like to create your BoMC iso using Ubuntu , you might’ve noticed that BoMC doesn’t support it.

I’m on 10.04 and found that using the RHEL5 binary worked. At the time of writing, the name of the file is ibm_utl_bomc_3.00_rhel5_i386.bin . I tried the RHEL6 one first and it complained about a missing libssl library (libssl.so.10) so I would guess if you are on a newer version of Ubuntu, you should use this one instead.

You might see this error when executing it, and it will cause the downloads to fail

Can't find OS info file!

Simply execute this to create an Redhat release file at /etc/redhat-release , and this will make BoMC work.

sudo echo "Red Hat Enterprise Linux Server release 5.0 (Santiago)" > /etc/redhat-release

Then simply execute it like this, put in your machine details, and out comes the iso:

sudo ./ibm_utl_bomc_3.00_rhel5_i386.bin

Posted in howto, tip | 1 Comment

D-Bus library appears to be incorrectly set up; failed to read machine uuid: Failed to open “/var/lib/dbus/machine-id”

A simple fix for once. I usually see this problem when I’ve installed a barebones / headless system and then wanted to add xorg to it later.

This particular time, this error cropped up when trying to run Eclipse Memory Analyzer over a X11 Forwarding session using SSH. Eclipse would throw this error and fail to start.


process 3104: D-Bus library appears to be incorrectly set up; failed to read machine uuid: Failed to open "/var/lib/dbus/machine-id": No such file or directory
See the manual page for dbus-uuidgen to correct this issue.
D-Bus not built with -rdynamic so unable to print a backtrace
JVMDUMP006I Processing dump event "abort", detail "" - please wait.
JVMDUMP032I JVM requested System dump using '/root/mem/mat/core.20111216.145922.3104.0001.dmp' in response to an event
JVMDUMP010I System dump written to /root/mem/mat/core.20111216.145922.3104.0001.dmp
JVMDUMP032I JVM requested Java dump using '/root/mem/mat/javacore.20111216.145922.3104.0002.txt' in response to an event
JVMDUMP010I Java dump written to /root/mem/mat/javacore.20111216.145922.3104.0002.txt
JVMDUMP032I JVM requested Snap dump using '/root/mem/mat/Snap.20111216.145922.3104.0003.trc' in response to an event
JVMDUMP010I Snap dump written to /root/mem/mat/Snap.20111216.145922.3104.0003.trc
JVMDUMP013I Processed dump event "abort", detail "".

To fix it, run

dbus-uuidgen > /var/lib/dbus/machine-id

If you don’t have dbus-uuidgen , it’s in the dbus package, which can be installed by issuing yum install dbus (of course!).

Happy weekend!

Posted in tip | 28 Comments

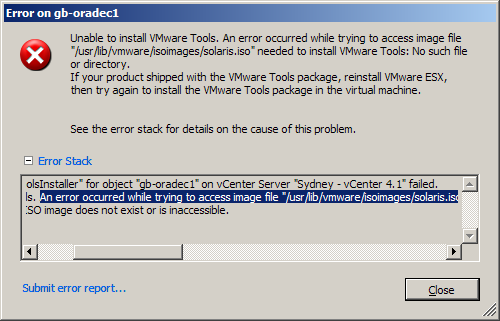
Unable to install VMware Tools – no such file or directory

You know those issues that just sit in the background for a while until you can’t take it anymore and have to work them out. You have to fix them. You just have to make them stop?!? (Maybe not, heh). This problem was one of those ones.

For a number of our VMware guests, when being a good guy and installing VMware Tools, this error would come up.


Call "VirtualMachine.MountToolsInstaller" for object "gb-oradec1" on vCenter Server "Sydney - vCenter 4.1" failed.
Unable to install VMware Tools. An error occurred while trying to access image file "/usr/lib/vmware/isoimages/solaris.iso" needed to install VMware Tools: 2 (No such file or directory). If your product shipped with the VMware Tools package, reinstall VMware ESX, then try again to install the VMware Tools package in the virtual machine.
The required VMware Tools ISO image does not exist or is inaccessible.

Can't find VMware Tools!

Seems like a bit of an overreaction to try to get you to reinstall ESXi.

Now I use the very cool repo/unmanaged solution for the majority of our guests, since they run RHEL 6. If you don’t know about this check it out here. If you use RHEL kickstart, it is trivial to make new guests come out with tools installed and the tools repo enabled. Anyway, enough gushing, just check it out if you use RHEL on VMware.

I should note before getting into this, that I am running ESXi from a USB key. This problem seems to be related to the backend media that ESXi is installed on, so if you’re on different media then your mileage may vary. I’d be interested to hear from anyone who sees this error on a non usb platform.

Following the path given in the error on a good system (/usr/lib/vmware/isoimages/) leads you to a symlink called /productLocker/vmtools/ , which in turn is a symlink to /locker/packages/4.1.0/ . No idea why this has to be so complicated, but there’s probably a reason.

After some more digging (tracking back through the innumerable symlinks), it seemed like the partition below was missing.

/dev/disks/mpx.vmhba32:C0:T0:L0p8

The bad one

On a bad system

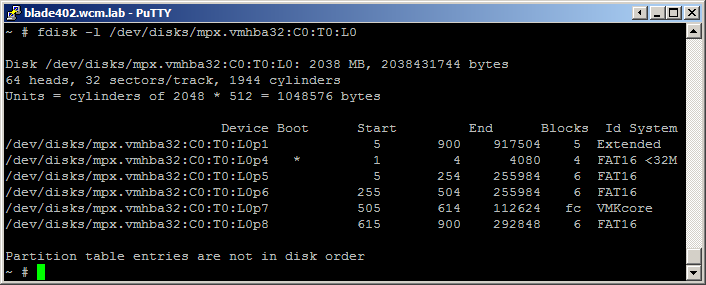
This is from a good system, notice the last partition

This is from a good system, notice the last partition

The mount point for this partition seems to be

/vmfs/volumes/Hypervisor3

Which was missing too. /vmfs/volumes/Hypervisor3 is a symlink back to the volume id of the partition. In the end, I just couldn’t figure out a pattern. Some hosts were fine and had the /productLocker symlink, and a bunch didn’t have it. Consequently, I have no idea how this happened to us, or how to prevent it, but let’s just get on and fix it. The solution seems clear, let’s just make a new partition, format it, and dump the files from a working system on there.

Partitioning the disk as FAT16 was easy (fdisk ftw), but formatting the disk was proving difficult. ESXi doesn’t seem to contain a working version of mkfs.vfat on it, and vmkfstools won’t do FAT16. (Also tried a mkfs.vfat binary from RHEL 5; didn’t work either). Of course, I could’ve pulled the usb key out, and fixed it up on a linux box, but I found an easier way.

To summarize, you create a scratch disk directory for the host inside some of your shared storage, and then point the host to it. After rebooting the host all the symlinks point to the new scratch location on your datastore. For complete steps on how to do it read this. VMware also recommends this as a best practice since your ESXi scratch disk area is now not on a limited ram disk.

Ok. Great. Now ESXi has a place to put VMware Tools. But how do you get the Tools files on there? I found the easiest way to do this was to apply a VMware Tools fix from VUM (VMware Update Manager). If you don’t use VUM I’m sure you could manually download the fix and apply it on your host using esxupdate. The latest VMware Tools fix is here. And that’s it – problem solved!

Posted in solution | Tagged , , | 11 Comments

What sort of disk is VMware ESXi running on?

#Edit 5th Jan, 2012#
OMG – Don’t read all this crap, I’ve stumbled on how to actually do this properly. Just run this:

~ # esxcfg-info -e
boot type: visor-usb

Boom!

#Original Post#
We’re working on a boot from SAN ‘modernization’ project at the moment. Which is another way to say we’re getting rid of it. It’s way too complicated! And if the SAN goes down, all the boot partitions go with it. This just introduces an extra dependency that can completely nullify any fault tolerant or HA strategies that you may have in place in the vSphere layer. No prizes for guessing who this has happened to recently!

What to do instead? The new HS22V blade systems we are using have a tiny little usb port on the motherboard where you can install a USB key. Load ESXi on it, and you’re golden.

The key

So I need to make a list of which hosts need fixing up and which are booting from usb already or are using local storage. We’d started this process recently but want to step it up now. But which ESXi machines in the farm are booting from what ? How can you tell?

With fdisk of course – simply enable Remote Tech Support mode (see here for details) and ssh into your host.

Run fdisk -land look for the ‘*’ in the boot column. That’s the partition that ESXi is booting from. If you see a device called /dev/disks/mpx.vmhba32:C0:T0:L0 , you’re booting from usb. If the device is something more like /dev/disks/naa.600508e000000000194a56b4310b4804 you are booting from SAN or a local disk.

Here’s the fdisk output for my usb stick.

Disk /dev/disks/mpx.vmhba32:C0:T0:L0: 2038 MB, 2038431744 bytes
64 heads, 32 sectors/track, 1944 cylinders
Units = cylinders of 2048 * 512 = 1048576 bytes

Device Boot Start End Blocks Id System
/dev/disks/mpx.vmhba32:C0:T0:L0p1 5 900 917504 5 Extended
/dev/disks/mpx.vmhba32:C0:T0:L0p4 * 1 4 4080 4 FAT16 <32M /dev/disks/mpx.vmhba32:C0:T0:L0p5 5 254 255984 6 FAT16 /dev/disks/mpx.vmhba32:C0:T0:L0p6 255 504 255984 6 FAT16 /dev/disks/mpx.vmhba32:C0:T0:L0p7 505 614 112624 fc VMKcore /dev/disks/mpx.vmhba32:C0:T0:L0p8 615 900 292848 6 FAT16

Posted in tip | Leave a comment

Uninstall Process Server, keep Portal Server

Wow, slow 2011 on the blog so far. Time to get back into it.

I was asked by a customer how to uninstall Process Server, while keeping your Portal Server intact. I couldn’t find any documentation or steps to do this, so I figured it out for them.
“Your mileage may vary” – give this a try on a test box first, before you try on a production box. I didn’t test clusters either, although I don’t see how they would present a problem.

These steps are valid for 6.0 .

Unfortunately, the Process Server uninstaller doesn’t do a great job of cleaning up after itself, so we need to go around after it and clean up the mess.

1. Why not confirm you have Process Server installed first? Try:

AppServer/bin/versionInfo.sh

If you get back something with this in it:

Installed Product
---------------------------------------------------
Name IBM WebSphere Process Server
Version 6.0.2.5
ID BPC
Build Level o0843.03
Build Date 10/31/08

Bingo! You have Process server.

2. Run the config task bpe-unconfig . This config task will uninstall Process Server related components from your Portal Server (like the Task Container Enterprise Apps) .

WPSconfig.sh bpe-unconfig

3.

Stop all AppServer processes and then run the Process server uninstaller, which you will find at :

AppServer/_uninstwbi/uninstall

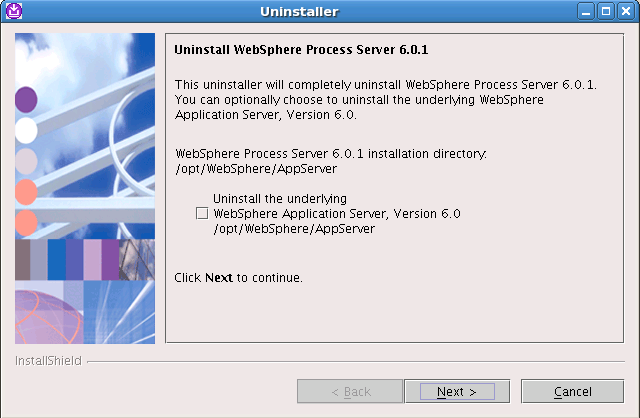
Take care to make sure this box below is unticked, so your whole AppServer isn’t uninstalled.

4. After the uninstaller is completed, delete the following jars in AppServer/lib . They are Process Server jars, and the Portal Server (or server1) will not start until you do this. As you can see there are tons of them. I got the list from seeing what was on the Process Server install iso. This list worked for me in my testing (which consisted of starting Portal and the Admin Console and making sure the UI still worked), but I can’t vouch for any custom code that you are running. As always, try this out in a test environment first, and take a backup before messing around with AppServer/lib . This seems to be a superset of what was installed on my system too – so don’t be alarmed if some of the jars in this list are not present on your system.

$WAS_HOME/lib/ArtifactLoaderImpl.jar
$WAS_HOME/lib/ArtifactLoader.jar
$WAS_HOME/lib/ArtifactResolver.jar
$WAS_HOME/lib/ast-ejbrdbmapping.jar
$WAS_HOME/lib/ast-ejbwsext.jar
$WAS_HOME/lib/ast-j2eewsext.jar
$WAS_HOME/lib/ast-sqlmodel.jar
$WAS_HOME/lib/ast-wrdj2ee.jar
$WAS_HOME/lib/bpcdma.jar
$WAS_HOME/lib/bpcinterop.jar
$WAS_HOME/lib/bpcupgrade.jar
$WAS_HOME/lib/bpc-validation.jar
$WAS_HOME/lib/bpeappinstall.jar
$WAS_HOME/lib/bpecommon.jar
$WAS_HOME/lib/bpecore.jar
$WAS_HOME/lib/bpedeployment.jar
$WAS_HOME/lib/bpegenerator.jar
$WAS_HOME/lib/bpeheaders.jar
$WAS_HOME/lib/bpe.jar
$WAS_HOME/lib/bpel.jar
$WAS_HOME/lib/bpelpp.jar
$WAS_HOME/lib/bpelservices.jar
$WAS_HOME/lib/bpelterms.jar
$WAS_HOME/lib/bpertfw.jar
$WAS_HOME/lib/bpevalidation.jar
$WAS_HOME/lib/brbClient.jar
$WAS_HOME/lib/brbRuleMgmtApp.jar
$WAS_HOME/lib/brbServer.jar
$WAS_HOME/lib/brcore.jar
$WAS_HOME/lib/brulescore.jar
$WAS_HOME/lib/brulescore_nl1.jar
$WAS_HOME/lib/brulescore_nl2.jar
$WAS_HOME/lib/brules.jar
$WAS_HOME/lib/brules-model.jar
$WAS_HOME/lib/brules-scdl.jar
$WAS_HOME/lib/brules-scdl-validation.jar
$WAS_HOME/lib/brules-scdl-validation_nl1.jar
$WAS_HOME/lib/brules-scdl-validation_nl2.jar
$WAS_HOME/lib/brules-validation.jar
$WAS_HOME/lib/brules-validation_nl1.jar
$WAS_HOME/lib/brules-validation_nl2.jar
$WAS_HOME/lib/bsm-runtime.jar
$WAS_HOME/lib/cbcore.jar
$WAS_HOME/lib/cem.jar
$WAS_HOME/lib/cemsop.jar
$WAS_HOME/lib/cmmImpl.jar
$WAS_HOME/lib/cmm.jar
$WAS_HOME/lib/commondbinstall.jar
$WAS_HOME/lib/commonj.connector.jar
$WAS_HOME/lib/commons-jxpath.jar
$WAS_HOME/lib/compensate_blob4k_ejb.jar
$WAS_HOME/lib/compensate_ejb.jar
$WAS_HOME/lib/compensate.jar
$WAS_HOME/lib/compensate_oracle9i_oci_ejb.jar
$WAS_HOME/lib/compensation.jar
$WAS_HOME/lib/core-validation.jar
$WAS_HOME/lib/corona-ejbplugin.jar
$WAS_HOME/lib/corona-emfworkbenchedit.jar
$WAS_HOME/lib/corona-emfworkbench.jar
$WAS_HOME/lib/corona-j2eeplugin.jar
$WAS_HOME/lib/corona-wsdl.jar
$WAS_HOME/lib/correlationsphere.jar
$WAS_HOME/lib/ctcbpeluiex.jar
$WAS_HOME/lib/ctcformatmodel.jar
$WAS_HOME/lib/ctcj2ee.jar
$WAS_HOME/lib/ctc-wsdl.jar
$WAS_HOME/lib/ctcwsdl.jar
$WAS_HOME/lib/customization.jar
$WAS_HOME/lib/customization-model.jar
$WAS_HOME/lib/dmaemf.jar
$WAS_HOME/lib/eclipse-ecore.resources.jar
$WAS_HOME/lib/eclipse-jdtcore.jar
$WAS_HOME/lib/eclipse-mapping.jar
$WAS_HOME/lib/eclipse-osgi.jar
$WAS_HOME/lib/eclipse-resources.jar
$WAS_HOME/lib/eclipse-runtime.jar
$WAS_HOME/lib/eflow2.jar
$WAS_HOME/lib/extensionmodel.jar
$WAS_HOME/lib/fdl2bpelcore.jar
$WAS_HOME/lib/htmlshellwbi.jar
$WAS_HOME/lib/idgenerator.jar
$WAS_HOME/lib/ilm_impl.jar
$WAS_HOME/lib/ilm.jar
$WAS_HOME/lib/installbrmgr.jar
$WAS_HOME/lib/mediation_model.jar
$WAS_HOME/lib/mfc_model.jar
$WAS_HOME/lib/migration-wbi-CommonMigrationInterface.jar
$WAS_HOME/lib/migration-wbi-ics-heritageapi.jar
$WAS_HOME/lib/migration-wbi-ics.jar
$WAS_HOME/lib/mockobjects-alt-jdk1.3-0.09.jar
$WAS_HOME/lib/mockobjects-alt-jdk1.3-j2ee1.2-0.09.jar
$WAS_HOME/lib/mockobjects-core-0.09.jar
$WAS_HOME/lib/mockobjects-jdk1.3-0.09.jar
$WAS_HOME/lib/mockobjects-jdk1.3-j2ee1.2-0.09.jar
$WAS_HOME/lib/modelutils.jar
$WAS_HOME/lib/processbinding.jar
$WAS_HOME/lib/recoveryAdmin.jar
$WAS_HOME/lib/recoveryMBean.jar
$WAS_HOME/lib/relcodegen.jar
$WAS_HOME/lib/resolverutils.jar
$WAS_HOME/lib/rsadaptercci-wbi.jar
$WAS_HOME/lib/rsaexternal-wbi.jar
$WAS_HOME/lib/sca-async.jar
$WAS_HOME/lib/sca-common.jar
$WAS_HOME/lib/sca-container.jar
$WAS_HOME/lib/sca-deploy.jar
$WAS_HOME/lib/sca-ejb.jar
$WAS_HOME/lib/sca-j2c.jar
$WAS_HOME/lib/sca.jar
$WAS_HOME/lib/sca-java.jar
$WAS_HOME/lib/sca-jms.jar
$WAS_HOME/lib/sca-managed.jar
$WAS_HOME/lib/sca-style.jar
$WAS_HOME/lib/sca-webservice.jar
$WAS_HOME/lib/scdl-ae.jar
$WAS_HOME/lib/scdl-eis.jar
$WAS_HOME/lib/scdl-ejb.jar
$WAS_HOME/lib/scdl-infoserver.jar
$WAS_HOME/lib/scdl.jar
$WAS_HOME/lib/scdl-java.jar
$WAS_HOME/lib/scdl-mediation.jar
$WAS_HOME/lib/scdl-mfc.jar
$WAS_HOME/lib/scdl-moduletype.jar
$WAS_HOME/lib/scdl-process.jar
$WAS_HOME/lib/scdl-task.jar
$WAS_HOME/lib/scdl-webservice.jar
$WAS_HOME/lib/scdl-wsdl.jar
$WAS_HOME/lib/selector.jar
$WAS_HOME/lib/selector-model.jar
$WAS_HOME/lib/selector-scdl.jar
$WAS_HOME/lib/selector-scdl-validation.jar
$WAS_HOME/lib/selector-scdl-validation_nl1.jar
$WAS_HOME/lib/selector-scdl-validation_nl2.jar
$WAS_HOME/lib/selector-validation.jar
$WAS_HOME/lib/selector-validation_nl1.jar
$WAS_HOME/lib/selector-validation_nl2.jar
$WAS_HOME/lib/sibx.admin.commands.jar
$WAS_HOME/lib/sibx.aspects.jar
$WAS_HOME/lib/sibx.common.jar
$WAS_HOME/lib/sibx.context.jar
$WAS_HOME/lib/sibx.eets.debug.jar
$WAS_HOME/lib/sibx.mediation.eets.jar
$WAS_HOME/lib/sibx.mediation.engine.jar
$WAS_HOME/lib/sibx.mediation.flowaction.impl.jar
$WAS_HOME/lib/sibx.mediation.flowaction.jar
$WAS_HOME/lib/sibx.mediation.model.jar
$WAS_HOME/lib/sibx.mediation.primitives.jar
$WAS_HOME/lib/sibx-metadata.jar
$WAS_HOME/lib/sibx-profiles.jar
$WAS_HOME/lib/sibx.scax.runtime.jar
$WAS_HOME/lib/sibx-extensionchecker.jar
$WAS_HOME/lib/sibx.admin.commands.wsrr.jar
$WAS_HOME/lib/sibx.admin.runtime.impl.jar
$WAS_HOME/lib/sibx.wccm.config.wsrrresources.jar
$WAS_HOME/lib/sibx.wsrr.proxy.jar
$WAS_HOME/lib/sibx.admin.runtime.jar
$WAS_HOME/lib/sibx.admin.runtime.wsrr.jar
$WAS_HOME/lib/sibx.wccm.config.sibxscaresources.jar
$WAS_HOME/lib/smaputils.jar
$WAS_HOME/lib/smobo.jar
$WAS_HOME/lib/srm_impl.jar
$WAS_HOME/lib/srm.jar
$WAS_HOME/lib/staffsupport.jar
$WAS_HOME/lib/taskapi.jar
$WAS_HOME/lib/taskappinstall.jar
$WAS_HOME/lib/taskcemsop.jar
$WAS_HOME/lib/taskdeployer.jar
$WAS_HOME/lib/taskgenerator.jar
$WAS_HOME/lib/task.jar
$WAS_HOME/lib/taskldap.jar
$WAS_HOME/lib/taskmbean.jar
$WAS_HOME/lib/taskscdlvalidation.jar
$WAS_HOME/lib/tasksystem.jar
$WAS_HOME/lib/taskuserregistry.jar
$WAS_HOME/lib/taskvalidation.jar
$WAS_HOME/lib/tel.jar
$WAS_HOME/lib/vfdcore.jar
$WAS_HOME/lib/WBIAdapterBGRuntime.jar
$WAS_HOME/lib/WBIAdapterRuntime.jar
$WAS_HOME/lib/wbia.jar
$WAS_HOME/lib/wbiBOmigration.jar
$WAS_HOME/lib/wbiBOS.jar
$WAS_HOME/lib/wbiBOValidator.jar
$WAS_HOME/lib/wbiCore.jar
$WAS_HOME/lib/wbicoreupgrade.jar
$WAS_HOME/lib/wbiinstall.jar
$WAS_HOME/lib/wbiMapService.jar
$WAS_HOME/lib/WBIMCBEBuilder.jar
$WAS_HOME/lib/wbi-mediation-core.jar
$WAS_HOME/lib/wbiMonitorCore.jar
$WAS_HOME/lib/wbiMonitorPolicy.jar
$WAS_HOME/lib/wbiPS.jar
$WAS_HOME/lib/wbiRelMgr.jar
$WAS_HOME/lib/wbiRS.jar
$WAS_HOME/lib/wbischedulercommon.jar
$WAS_HOME/lib/wbisession.jar
$WAS_HOME/lib/wbisessionPolicy.jar
$WAS_HOME/lib/wbiupgrade.jar
$WAS_HOME/lib/wbiutil.jar
$WAS_HOME/lib/wbi-validation.jar
$WAS_HOME/lib/wccm_services_bpc.jar
$WAS_HOME/lib/wccm_services_core.jar
$WAS_HOME/lib/wccm_services_wbi.jar
$WAS_HOME/lib/wcdl.jar
$WAS_HOME/lib/wcdl-process.jar
$WAS_HOME/lib/wcdl-service.jar
$WAS_HOME/lib/wcdl-wsif.jar
$WAS_HOME/lib/wpcr.jar
$WAS_HOME/lib/wpsanttasks.jar
$WAS_HOME/lib/WPS_IVTClient.jar
$WAS_HOME/lib/ws-bpc-config-appdeploy.jar
$WAS_HOME/lib/ws-bpc-config-resources.jar
$WAS_HOME/lib/ws-bpc-config-server.jar
$WAS_HOME/lib/ws-config-admin.jar
$WAS_HOME/lib/ws-core-config-server.jar
$WAS_HOME/lib/ws-core-j2eex.jar
$WAS_HOME/lib/ws-wbi-config-cell.jar
$WAS_HOME/lib/ws-wbi-config-resources.jar
$WAS_HOME/lib/ws-wbi-config-server.jar
$WAS_HOME/lib/ws-wbi-j2eex.jar
$WAS_HOME/lib/wtembean.jar

If you don’t delete these jars, you will get the following error message after issuing startServer.sh :


ADMU0116I: Tool information is being logged in file
/opt/WebSphere/AppServer/profiles/wp_profile/logs/server1/startServer.log
ADMU0128I: Starting tool with the wp_profile profile
ADMU3100I: Reading configuration for server: server1
com.ibm.ws.exception.WsException: Error processing plugin for
jar:file:/opt/WebSphere/AppServer/lib/scdl-infoserver.jar!/META-INF/ws-server-model.init
class: com.ibm.wsspi.sca.scdl.infoserver.impl.InfoserverPackageImpl
at com.ibm.ws.config.ModelMgr.initializeModels(ModelMgr.java:110)
at com.ibm.ws.config.ModelMgr.initialize(ModelMgr.java:49)
at com.ibm.ws.runtime.service.RepositoryImpl.(RepositoryImpl.java:48)
at com.ibm.ws.runtime.service.RepositoryImpl.(RepositoryImpl.java:39)
at com.ibm.ws.runtime.service.RepositoryFactoryImpl.createRepository(RepositoryFactoryImpl.java:32)
at com.ibm.ws.runtime.service.RepositoryFactory.createRepository(RepositoryFactory.java:55)
at com.ibm.ws.management.tools.WsServerLauncher.initializeRepositoryAndLauncher(WsServerLauncher.java:393)
at com.ibm.ws.management.tools.WsServerLauncher.runTool(WsServerLauncher.java:265)
at com.ibm.ws.management.tools.AdminTool.executeUtility(AdminTool.java:230)
at com.ibm.ws.management.tools.WsServerLauncher.main(WsServerLauncher.java:108)
at sun.reflect.NativeMethodAccessorImpl.invoke0(Native Method)
at sun.reflect.NativeMethodAccessorImpl.invoke(NativeMethodAccessorImpl.java:88)
at sun.reflect.NativeMethodAccessorImpl.invoke(NativeMethodAccessorImpl.java:61)
at sun.reflect.DelegatingMethodAccessorImpl.invoke(DelegatingMethodAccessorImpl.java:60)
at java.lang.reflect.Method.invoke(Method.java:391)
at com.ibm.ws.bootstrap.WSLauncher.run(WSLauncher.java:219)
at java.lang.Thread.run(Thread.java:571)
Caused by: java.lang.reflect.InvocationTargetException
at sun.reflect.NativeMethodAccessorImpl.invoke0(Native Method)
at sun.reflect.NativeMethodAccessorImpl.invoke(NativeMethodAccessorImpl.java:88)
at sun.reflect.NativeMethodAccessorImpl.invoke(NativeMethodAccessorImpl.java:61)
at sun.reflect.DelegatingMethodAccessorImpl.invoke(DelegatingMethodAccessorImpl.java:60)
at java.lang.reflect.Method.invoke(Method.java:391)
at com.ibm.ws.config.ModelMgr.initializeModels(ModelMgr.java:106)
... 16 more

5. It’s also a good idea to clean out wp_profile/logs/* as there is a cache of jar file paths and their associated classes (the preload cache) that will need to be regenerated after deleting those jars.

6. The only thing the bpe-unconfig task doesn’t seem to do is delete the BPE shared library. To do this, start server1, and log in to the admin console. Navigate to Environment -> Shared Libraries and highlight the BPE library and click delete.

7. You’re done, start Portal and test everything works!

I also wrote a little script that does some checks and then does all this for you (except for step 6 which I couldn’t be inspired enough to write a jacl script for). It’s fairly quick and dirty, but if nothing else it will give you an idea of what has to happen to remove Process Server. You can get it here. Just rename the suffix after you download it. Understandably, WordPress would not yet me save a shell script up to my server.

Posted in howto | Tagged , , , , | Leave a comment

How to use the PVSCSI driver on Ubuntu Lucid

One of the most popular posts on the site has been about how to enable the paravirtualized scsi driver (pvscsi) on your root partition in a RHEL system. I wrote some pretty complex steps about how you could automate this through RHEL’s kickstart system. A reader response to the prompted me to try it out pvscsi on Ubuntu Server (10.04) . Well there’s not much to say – it just works! .

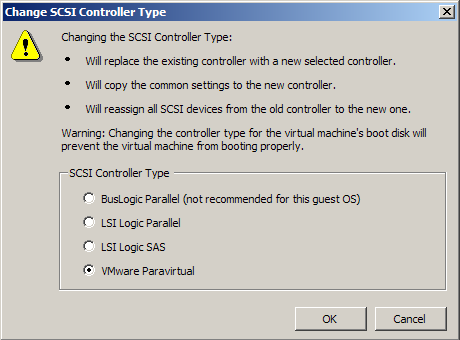
When you create your VM in vSphere, simply select the “Custom” option, rather than the “Typical” one as custom allows you to pick your disk type. When the disk type radio button comes up select PVSCSI – and that’s it. When you run the Ubuntu install, the installation process will see the disk as normal, and there it is, you’re done.
Setting the SCSI Controller Type

I’m not sure exactly why this this works in Ubuntu – whether the pvscsi driver has been added to a later version of the kernel, or if Ubuntu/Debian has patched the kernel to include support for it.

While we are on the subject of paravirtualized drivers, the vmxnet3 driver also works out of the box in the Ubuntu 10.04 install.

I’ll give it a try on RHEL6 soon, I haven’t tried it yet and am curious if it works in the same way.

There are some caveats about pvscsi.

There are some very good reasons not to use it – first it’s not supported by VMware on the boot disk as described above, and secondly it should not be used in a low throughput environment.

Update: 11th Feb, 2011
The gotchas around pvscsi has changed – according to this KB article , the issue Scott identified with pvscsi in non intensive I/O workloads has gone away in vSphere 4.1, so . Thanks to at Matt Liebowitz at thelowercasew.com for spotting this. You can read his post on it here. . Matt asserts that the boot disk restriction is gone in 4.1 also, but it still unfortunately applies on Linux guests, according to this other KB article. I would suspect this is because it has been so tricky to configure. With it being included out of the box in Ubuntu Server, maybe they will lift this restriction soon? Personally, since I am running a dev and test lab, I think I will switch over to it exclusively anyway.

Posted in howto | Tagged , , , | Leave a comment

Followup – ERRORCODE=-4214, SQLSTATE=28000 from DB2

I’ve done a bunch of testing over the last week around this error, installing different fixpacks and versions of DB2 on Ubuntu.

To recap, this error happens because DB2 can’t understand the more modern and secure sha512 password cipher and must use the older md5 cipher . About 6 months ago I wrote a post about how to workaround the problem on Ubuntu and other modern Linux distributions.

To make a long story short, this problem goes away with DB2 9.5 fixpack 5 , and DB2 9.7 . It is still present in DB2 9.1 fixpack 9, which is the most recent version of the DB2 9.1 series at the moment, so you will need to perform the steps in the linked post above if you need to be on this version. Otherwise, it would be much simpler and more secure to go to the latest fixpack of 9.5 or 9.7.

Posted in solution | Leave a comment

DB2 Silent Install Error: The return value is “5121”.

I hit an interesting problem with DB2 yesterday. I’m a big user of the DB2 silent install. This is a system where you run the DB2 install once manually, and it generates a response file for you. Then you can pass the response file to the installer and run unattended installs. This is great if you want to run the install hundreds of times 🙂 .

One of the great things about how DB2 releases fixpacks is that they are installable. What I mean by this is that you don’t have to install the first version of the software and apply patches to it, you can just apply the patch at the outset.

When testing out DB2 9.7 fixpack 2 on Linux, I hit a weird error:


DBI1191I db2setup is installing and configuring DB2 according to the
response file provided. Please wait.

A minor error occurred while installing "DB2 Enterprise Server Edition " on
this computer. Some features may not function correctly.

For more information see the DB2 installation log at "/tmp/db2setup.log".

It was a bit more like a major error. The DB2 installer could not create the instance user and so could not create the instance. Which means the system is pretty much useless. The following turned up in the db2setup.log:


ERROR: An error occurred while creating the user "dasusr1" for the DB2
Administration Server. The return value is "5121".

ERROR: One or more errors occurred while creating the DB2 Administration
Server. The DB2 Administration Server may not function properly. Create the DB2
Administration Server manually. If the problem persists contact your technical
service representative.

Creating the DB2 Administration Server :.......Failure
Initializing instance list :.......Success
ERROR: One or more errors occurred while committing the changes to the user
"db2inst1". Create or make any changes to this user manually.

What was interesting was the installer would breeze through creating the groups, but baulk on creating the users. The problem turned out to be a mismatch between the algorithm used to encrypt and read back the passwords in the response file. Something changed in the algorithm in DB2 9.7 FP2 and I was using an old response file from the GA version of the code . Both versions are incompatible with each other. You can clearly see the differences below.

9.7 GA, 9.7 FP1 (also works with 9.5) .

INSTANCE = inst1
inst1.TYPE = ese
* Instance-owning user
inst1.NAME = db2inst1
inst1.GROUP_NAME = db2iadm1
inst1.HOME_DIRECTORY = /home/db2inst1
inst1.PASSWORD = 593230133242295434315043707434799413346823001425633741538145032334202723517094195256569
ENCRYPTED = inst1.PASSWORD

9.7 FP2

INSTANCE = inst1
inst1.TYPE = ese
* Instance-owning user
inst1.NAME = db2inst1
inst1.GROUP_NAME = db2iadm1
inst1.HOME_DIRECTORY = /home/db2inst1
inst1.PASSWORD = 333377148682264443740525262714481366605672981260304236138250671067315119230836024976809300232642443192164424364566092461990364794426528249626805585662932723454154505223133504126517289109622925732216931363336627325161387322413424782188354693567389513644491011426236242812854398233823216405116523748602223626725153057401514552431215907582326503484343543245585453652477658337667246270282392750290224467612813561667382216411648317659354574148559364624131307601139423363164272592837646746588233795445379795763335562194101711319501429563041430692347784922133738943433213046652867344146350193523632002344344968434509267453578515230295356956656970264132961230904523543431572425682015412550223268301328365218036730543424740299692654533629583623984282175520182920793232805290462441180635519113425850809653489466271627442347605434565555912103124813084156657044455642051333441444221049349683381306664113266463298589325748192428273032967352323550433224727201724533057720433345083348938615273614458562569435358516301810326296564555483465334307465096045451631234857628833344831302847557863641503469395590956642326285343632674204393455844314984023245416843221521387423661126412838802637787444011204021973003314770152575062831212231440453524156424162067084343531342553063362371223856227524359124365293692843255244177691321435376512151401304564523708552253510965360349256973548902836644206322692286234882874075305008643214554224269807724973657083122573975292329143605222957342981127836380521658560251613836011663326775931421125833685047046413195983740
ENCRYPTED = inst1.PASSWORD

Obviously security has been increased in FP2 because the password hash is so much longer. Please note that it’s not forwards compatible either. What I mean by this is that the newer version of the response file will not work with older versions of the code either.

To conclude, the solution in this case is simple. Rerun the installer that comes with DB2 9.7 FP2 and generate a new response file for use with this version. I looked through the DB2 APARs list trying to find the fix that changed the encryption algorithm, but couldn’t see it.

Posted in solution | Tagged , , , | Leave a comment

Cross platform DB2 backup and restore

DB2 backups are platform specific. Well, pretty much, it’s a bit complicated.

Recently, someone sent me a Windows DB2 backup for me to look at, and I wanted to move it to a Linux machine.

Here’s some steps about how you would do this.

1. On the source machine run:

db2look -e -o database.sql -l -d

where is the name of the database you want to move.

2. Copy the database.sql to your destination machine.

3. Create a database on the destination machine. You can use the same name, or use a different name and edit first connect statement in the database.sql file to point to the new name.

4. If you look at the database.sql, you will notice that the CREATE TABLESPACE commands will have paths in them. This will probably present a problem, since the paths are unlikely to exist on your destination machine. There are a number of ways you could deal with this, but the easiest in my opinion is to just use DB2’s automatic storage feature and let DB2 worry about it. To show you what I mean by this, here is a tablespace definition from my source database script, straight from db2look.

CREATE REGULAR TABLESPACE "ICMLFQ32" IN DATABASE PARTITION GROUP IBMDEFAULTGROUP PAGESIZE 32768 MANAGED BY SYSTEM
USING ('C:\DB2\NODE0000\SQL00001\ICMLFQ32')
EXTENTSIZE 32
PREFETCHSIZE AUTOMATIC
BUFFERPOOL ICMLSMAINBP32
OVERHEAD 7.500000
TRANSFERRATE 0.060000
DROPPED TABLE RECOVERY ON;

You can see that a Unix/Linux DB2 install would puke on the path in there. Using automatic storage command this becomes:

CREATE TABLESPACE ICMLFQ32 PAGESIZE 32 K MANAGED BY AUTOMATIC STORAGE BUFFERPOOL ICMLSMAINBP32

Much simpler, but you will need to change these tablespace definitions by hand.

5. After fixing up the tablespace paths, try executing:

db2 -tvf database.sql

I had a problem on my system, doing a Windows -> Linux restore. The database.sql had Windows line endings in it, and so when running it on Linux the command just hung. Running dos2unix database.sql fixed it. (This problem was the actual point of this post, but it seemed hard to explain by itself, so…. here we are).

6. Now you should have a skeleton database on the destination, with all the tables there just ready to receive data. To copy the actual data, we’ll be using db2move.
On the source machine, create a new folder and change into it, and then run:

db2move export

7. This should fill the folder up with .ixf and .msg files . Copy the entire folder to your destination machine.

8. On the destination machine change to the export folder you just copied over and run:

db2move load

9. db2load temporarily suspends the referential integrity constraints of DB2. This is done so it doesn’t matter which order you load tables in. But since you have suspended these checks while the data is being loaded in you will need to go and make db2 check each table, to make sure that any referential integrity constraints in the database are valid. If you don’t, you get back a message like this when accessing any tables that you have loaded:

SQL0668N Operation not allowed for reason code "1" on table "".

This means – “You need to check this table, to make sure it is valid” .

To do this, you can query the system catalog table to get back a list of all the tables that need checking, and with a little awk, generate a script to run against the database. There’s probably a prettier way to do this, but it works.

db2 connect to
db2 -x select "tabschema,tabname from syscat.tables where status = 'C'" | awk '{print "SET INTEGRITY FOR "$1"."$2 " IMMEDIATE CHECKED;"}' > check.sql
db2 -tvf check.sql

Now you’re done. If you run a simple select statement against one of the tables you have loaded into the database, DB2 should return with the data. It’s worth noting that this method will work if changing versions of DB2, and will also cover moving from 32 bit versions of DB2 to 64 bit.

Posted in howto | Tagged , , , | Leave a comment